Halloween is upon us and I've seen some lovely themed nail art cropping up. One that really caught my eye is a matte skull look by @chelseaqueen on Instagram. Inspired by her I've created this tutorial of 3 different Halloween themed nail art designs which you could wear individually of mix them all together like I have!
You Will Need...
Your usual clear base coatOpaque black nail polish
Opaque red and white nail polish (preferably nail art pens)
Striping brush
Large dotting tool
Fine detail brush (if you don't have nail art pens)
Larger detail brush
Matte top coat

Step 1
Start with applying your usual base coat, then an opaque layer of a deep, opaque black. Make sure your nails are completely dry before moving on to the next step or you'll end up with streaky grey nail art!
Step 2 - Bones
Using the white opaque polish and a striping brush, paint a thick white line down most of the length of your nail. Then using the dotting tool add two white dots at each end to make a bone. Repeat this method and arrange the bones as you desire across as many nails as you'd like. For this tutorial I painted them on my middle and little fingers.


Step 3 - Skull
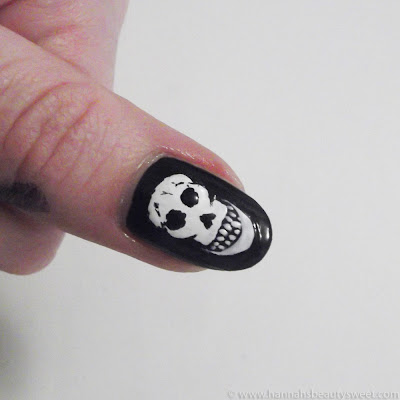
I chose the thumb for this skull as it's quite detailed so a bigger surface area to work with is preferable. Start with a fairly big white circle (using a bigger brush) before adding a smaller rectangular piece across the bottom to form the top half of the jaw.

Use a striping brush to paint a moon shaped crescent below the skull to form the lower law. Add 2 rows of tiny teeth using a fine detail brush/striping brush. Wait to dry fully.

Using a black nail nail art pen or fine detail brush paint in some eyes, shadows and cracks. You can also tidy up any uneven edges or mistakes by simply painting over them!

Step 4 - Blood Splatter
Dot on several little blobs of white polish on the bottom half of your nail and then join them up to create a blood splatter effect. Why white you might ask? It will be a much better base for the red we'll be adding later!
Step 5 - Mattify!
These designs all look more effective in matte (well I think so anyway!) so add a top coat of clear matte polish over each nail.
Step 6 - Blood Splatter 2: The Return
Now that your black and white blood splatter base is matte and dry, using an opaque red polish, go over the white with the red using a fine detail brush or nail art pen to get that glossy, shiny look.
So there you have it, 3 Halloween themed nail art designs! Are you planning out what you'll be wearing on your nails yet?
This comment has been removed by a blog administrator.
ReplyDeleteOops, sorry Holly, accidently hit remove instead of reply and now I can't get your comment back! D:
DeleteThanks though! I think the key is just time and patience! :)
wow i absolutely love your nail art!you have some great nail posts!i love this design and you have done it so well!im your newest follower!:)
ReplyDeleteThanks so much! :D
DeleteWonderful, I love all the details! :D
ReplyDeleteI'm writing a blog about travelling and other things I like, it would be awesome if you could go have a look at it and give me your opinion. Thanks!
http://journeyofalonelybird.blogspot.com.es/
Thank you! I'll check it out :)
Delete